Groups and Batches
As your sheet gets more complex, the Logic Editor canvas can get crowded. Groups and batch nodes are your two tools for keeping things manageable.
- Groups are visual containers that organize your nodes — like folders for your logic.
- Batch nodes handle repetitive patterns — one node replaces dozens of identical chains. They support both manual data tables and automatic repeating section discovery.
Logic Groups
A Logic Group is a visual box you place around a set of related nodes. It has no effect on how your logic runs — it is purely organizational.
Creating a Group
There are two ways to create a group:
- From existing nodes — Select the nodes you want to group (box-select by dragging on empty canvas, or Shift-click individual nodes), then right-click and choose to group the selected nodes. The group wraps around everything you selected.
- From the sidebar — Drag a Logic Group node from the Groups category in the sidebar onto the canvas. This creates an empty group that you can then drag nodes into.
Give the group a descriptive name (e.g., "Ability Modifiers", "Combat Calculations", "Spell DCs") so you can identify it at a glance.
Customizing Groups
- Name — Click the group title to rename it. Use descriptive names so you can find things quickly.
- Color — Each group can have a background color to visually distinguish different sections of your graph. For example, you might use blue for ability-related logic, red for combat, and green for skills.
- Resize — Drag the edges of a group to make it larger or smaller.
Moving Groups
When you drag a group, all the nodes inside it move together. This makes it easy to rearrange your canvas without breaking the layout of a carefully arranged set of nodes.
Groups and Connections
When you connect two nodes, if they are not in a group a group will be created. If one of them is in a group, the other one will be added to the group. If both nodes are in a group, the groups will be merged into a single group.
Batch Nodes
Batch nodes solve a specific problem: repetitive formulas.
Consider D&D 5e ability scores. The modifier formula is the same for all six abilities — floor((score - 10) / 2). Without batch nodes, you would need to build that chain of nodes six separate times, once for Strength, once for Dexterity, and so on. That is 42 nodes and 36 connections for what is conceptually a single formula.
A Batch Processor lets you define the formula once and apply it across a table of data points.
How Batch Nodes Work
A Batch Processor has two parts:
- Slots — The inputs and outputs of your formula. You define what goes in and what comes out.
- Rows — A table where each row maps to one instance of the formula. Each row specifies which attributes plug into which slots.
The Batch Processor runs your formula once for each row, substituting the row's attribute names into the slots.
Manual Mode
In manual mode, you define rows explicitly in a table. Each row maps specific attribute names to the batch's input and output slots. This is ideal for fixed sets of attributes like ability scores or skills.
Walkthrough: Ability Score Batch
Here is how you would set up a batch node that calculates all six D&D 5e ability modifiers.
Step 1: Define the Slots
Create the following slots on your Batch Processor:
| Slot Name | Direction | Purpose |
|---|---|---|
| Score | Input | The raw ability score |
| Modifier | Output | The calculated modifier |
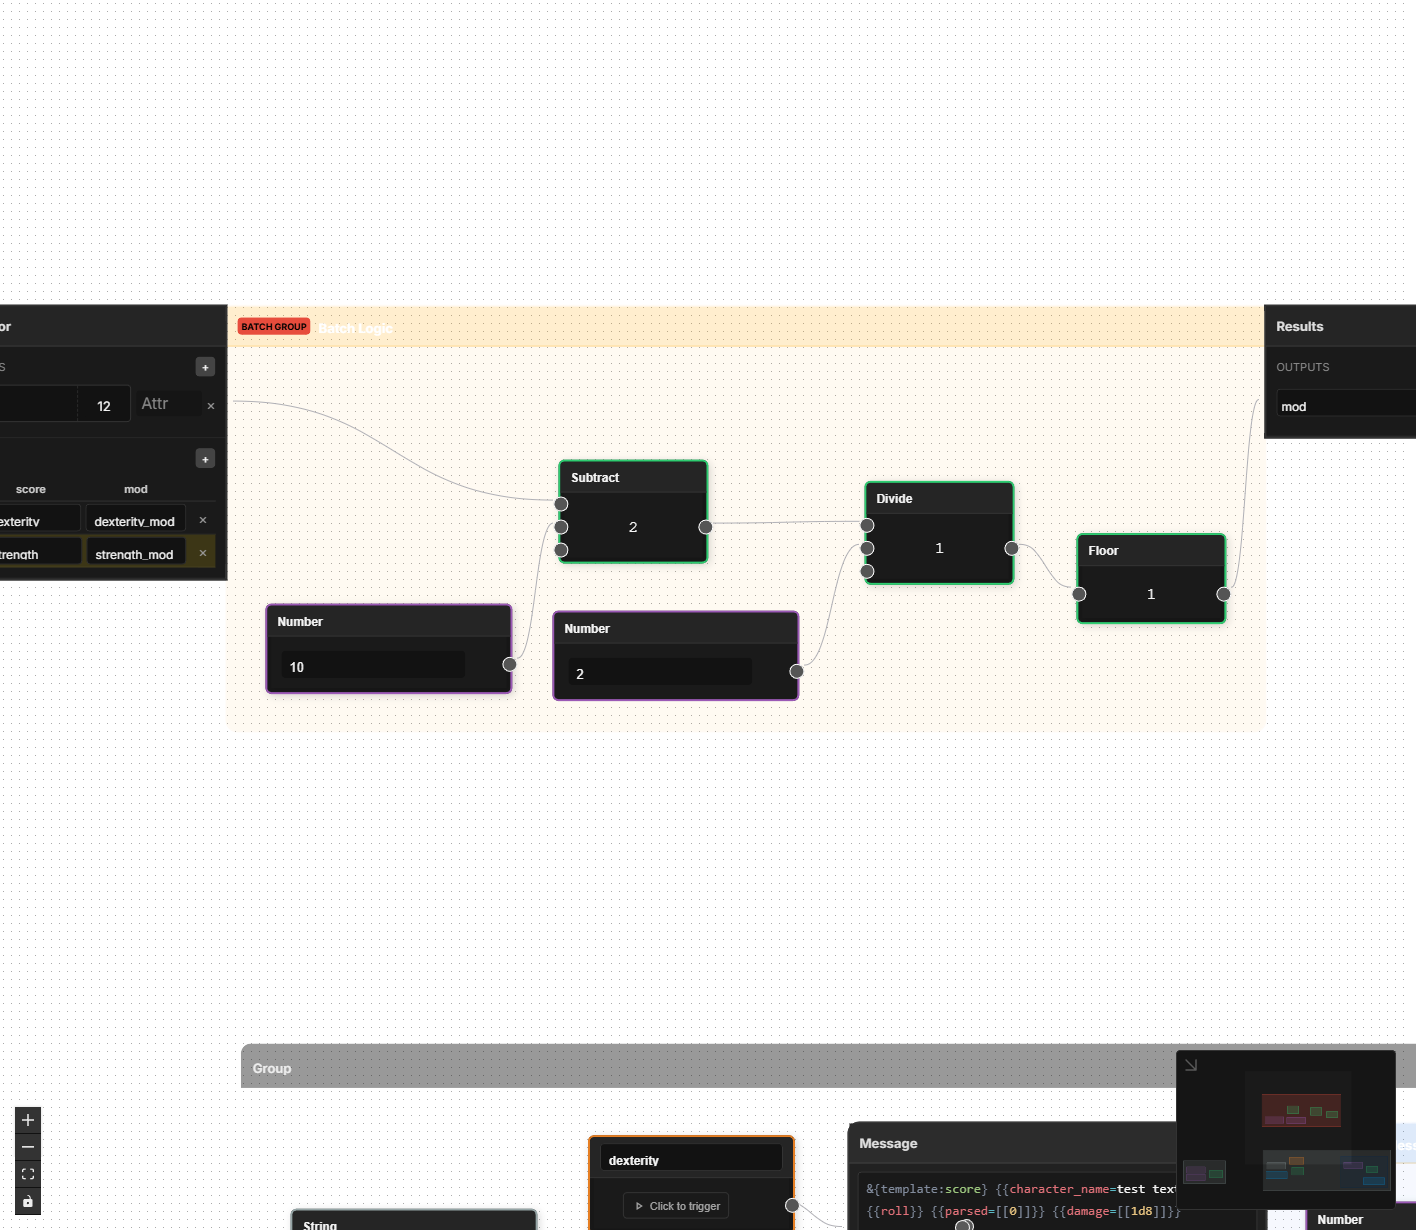
Step 2: Build the Subgraph
Inside the batch node, you build the formula just once using the slot names as stand-ins:
- Read Score (input slot)
- Subtract
10 - Divide by
2 - Floor the result
- Write to Modifier (output slot)
This is the same chain of nodes from the ability modifier example, but instead of referencing specific attributes like strength, it uses the generic slot names.
Step 3: Fill the Table
Each row tells the batch which real attributes to use:
| Row | Score | Modifier |
|---|---|---|
| Strength | strength | strength_mod |
| Dexterity | dexterity | dexterity_mod |
| Constitution | constitution | constitution_mod |
| Intelligence | intelligence | intelligence_mod |
| Wisdom | wisdom | wisdom_mod |
| Charisma | charisma | charisma_mod |
The Batch Processor applies the formula to every row. All six modifiers are calculated from a single set of nodes.
You can add a default value to any slot. If a row leaves a slot blank, the default is used instead. This is handy when most rows share a common value but a few are different.
Walkthrough: Skill Batch
Skills in D&D 5e follow another repetitive pattern: each skill bonus equals the relevant ability modifier plus the proficiency bonus (if proficient). That is 18 skills, all with the same formula but different ability scores and attribute names.
A skill batch might have these slots:
| Slot Name | Direction | Purpose |
|---|---|---|
| Ability Mod | Input | The relevant ability modifier (varies by skill) |
| Proficiency Flag | Input | Whether the character is proficient (0 or 1) |
| Prof Bonus | Input | The proficiency bonus value |
| Skill Bonus | Output | The calculated skill bonus |
The subgraph multiplies Prof Bonus by Proficiency Flag, then adds Ability Mod to get the final Skill Bonus.
Each row maps a skill to its specific attributes:
| Row | Ability Mod | Proficiency Flag | Prof Bonus | Skill Bonus |
|---|---|---|---|---|
| Athletics | strength_mod | athletics_prof | proficiency_bonus | athletics_bonus |
| Acrobatics | dexterity_mod | acrobatics_prof | proficiency_bonus | acrobatics_bonus |
| Arcana | intelligence_mod | arcana_prof | proficiency_bonus | arcana_bonus |
| Stealth | dexterity_mod | stealth_prof | proficiency_bonus | stealth_bonus |
| Perception | wisdom_mod | perception_prof | proficiency_bonus | perception_bonus |
| ... | ... | ... | ... | ... |
Notice that proficiency_bonus repeats in every single row — you could set it as the default for the Prof Bonus slot and leave those cells blank. Only rows that need a different value would need to fill that column in.
Adding Rows Later
One of the advantages of batch nodes is that adding more instances is easy. If you homebrew a new skill or your game system has additional ability scores, you just add a row to the table. No new nodes or connections needed.
Repeating Mode

Some calculations need to work across a dynamic number of rows — inventory items, spell lists, weapon attacks, or any repeating section where the player can add and remove entries. You cannot define these rows in a manual table because you don't know how many there will be.
Repeating mode solves this. Instead of a fixed table, the Batch Processor automatically discovers rows from a repeating section in your layout and runs the formula across all of them.
How It Works
- Set the batch node's Source Mode to Repeating.
- Choose the Section Name — the name of the repeating section in your layout (e.g.,
weapons,inventory,spells). Do not include therepeating_prefix. - Define your input and output slots as usual — these correspond to the attribute names inside each repeating row.
The Batch Processor scans all attributes matching the pattern repeating_{section}_{rowId}_{slotName} and builds rows automatically. When a player adds or removes a row in the repeating section, the batch updates to match.
Output Targets
In repeating mode, each output slot has an output target that controls where its result is written:
| Target | Where It Writes | Use Case |
|---|---|---|
| Row | Back to the same repeating row (e.g., repeating_weapons_-ABC123_total_attack) | Per-row calculations like total attack bonus |
| Running | A running total that accumulates across rows | Progressive totals like cumulative weight |
| Aggregation | A single top-level attribute (outside the repeating section) | Summary values like total weapon count or max damage |
Row is the default target and works just like manual mode — the result is written to an attribute scoped to the current row. Running and Aggregation targets are unique to repeating mode.
Aggregation Functions
Output slots with the Aggregation target use a built-in aggregation function to combine values from all rows into a single result. The aggregation output is written to an attribute prefixed with agg_.
| Function | Result | Example |
|---|---|---|
| SUM | Total of all row values | Total inventory weight |
| COUNT | Number of rows | Number of weapons equipped |
| MIN | Smallest row value | Lowest attack bonus |
| MAX | Largest row value | Highest damage roll |
| AVG | Average of all row values | Average spell level |
If you set an output slot's target to Aggregation but don't choose a function, it defaults to SUM. The aggregation result is available as an output handle prefixed with agg_ on the Batch Processor node (e.g., an output slot named weapon_count with COUNT aggregation produces an agg_weapon_count output handle).
Walkthrough: Weapon Attack Totals
Here is how you would use repeating mode to calculate a total attack bonus for each weapon in a repeating section.
Step 1: Set Up the Repeating Section
In the Layout Editor, create a repeating section named weapons. Inside it, add fields for attack_bonus (the base attack value), ability_mod (the relevant ability modifier), and total_attack (the calculated result).
Step 2: Create the Batch Processor
Add a Batch Processor to your logic graph. Set its Source Mode to Repeating and its Section Name to weapons.
Step 3: Define the Slots
| Slot Name | Direction | Output Target | Purpose |
|---|---|---|---|
| attack_bonus | Input | — | Base attack bonus from the weapon |
| ability_mod | Input | — | Relevant ability modifier |
| total_attack | Output | Row | Calculated total attack |
| weapon_count | Output | Aggregation (COUNT) | Total number of weapons |
Step 4: Build the Subgraph
Inside the batch, build the formula:
- Read attack_bonus (input slot)
- Read ability_mod (input slot)
- Add them together
- Write to total_attack (output slot)
Step 5: Test in the Editor
Add a few weapon rows in the Layout Editor preview. Each row's total_attack field should automatically calculate from its own attack_bonus and ability_mod values. The weapon_count aggregation output reflects how many weapons exist.
Row Management
In the editor, repeating section rows are created by adding entries in the Layout Editor's preview. Each row you add generates a set of attributes that the batch processor picks up automatically.
The row table uses type-aware inputs — cells automatically match the input type of the corresponding layout field. Checkboxes, radio buttons, and select dropdowns render as dropdown menus with the valid options pre-populated, while number fields show number inputs. This gives you an accurate editing experience directly in the batch node without switching back to the Layout Editor.
In the exported sheet on Roll20, rows are managed by the player using the repeating section's built-in Add/Remove buttons. The batch processor's logic is compiled into sheet worker code that uses getSectionIDs() to discover rows at runtime.
Dependency Tracking
The engine automatically tracks dependencies for repeating mode batches using wildcard patterns. When any attribute matching repeating_{section}_*_{slotName} changes, the batch re-evaluates.
Avoid creating circular dependencies where a repeating batch's output feeds back into its own input slots. The engine detects loops and will halt evaluation with an error.
When to Use Each Mode
Use a manual Batch Processor when:
- You have the same formula applied to three or more sets of attributes
- The formula is identical except for which attributes are read and written
- You might add more rows later (e.g., adding homebrew skills)
Use a repeating mode Batch Processor when:
- You need calculations inside a repeating section (inventory, spells, attacks)
- The number of rows is dynamic — players add and remove entries
- You need summary values across all rows (totals, counts, averages)
Use individual nodes when:
- The calculation is unique (e.g., Armor Class, which has its own special formula)
- There are only one or two instances of a pattern
- The logic varies significantly between instances
A good rule of thumb: if you catch yourself copying and pasting a chain of nodes, stop and consider whether a Batch Processor would be cleaner.
Manual batch nodes generate the same sheet worker code as individual nodes during export. Repeating mode batches generate getSectionIDs() calls to discover rows at runtime — this is the standard Roll20 pattern for working with repeating sections.